
PHASE 3 – MUSCULOSKELETAL ISSUES
Platinum Pilates Academy – Special Populations Manual
Scope Reminder for Instructors
Pilates instructors do not diagnose or treat medical conditions. Our role is to guide safe, intelligent movement based on medical clearance, client presentation, and current condition. We manage load, range of motion, alignment, and recognize when referral is necessary.
1 Plantar Fasciitis
Overview of the Condition
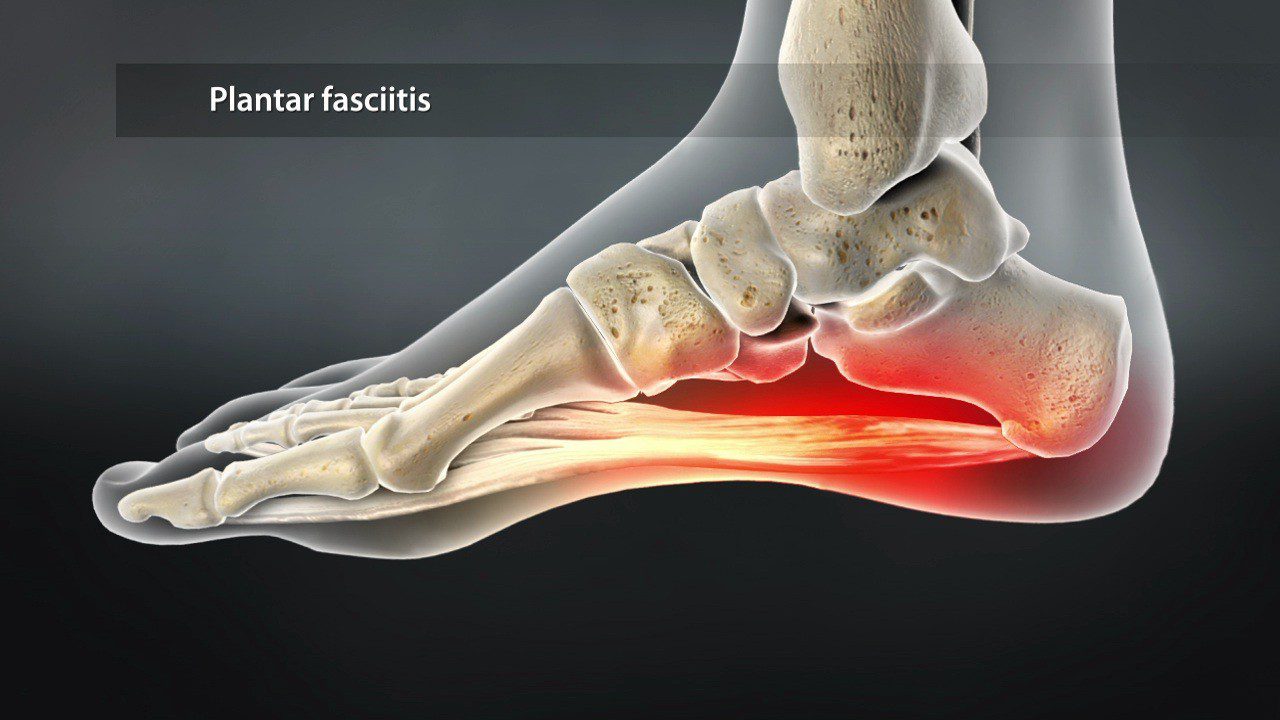
Plantar fasciitis is a condition that causes pain along the bottom of the foot, most commonly near the heel. It affects the plantar fascia, a thick band of connective tissue that runs from the heel bone to the base of the toes. This structure plays a crucial role in supporting the arch of the foot and helping the foot absorb forces during walking, running, and standing.
When the plantar fascia is repeatedly overloaded, small microscopic tears can develop in the tissue. This irritation often occurs near the attachment point at the heel. Factors such as tight calf muscles, weak foot stabilizers, poor footwear, or long periods of standing can increase strain on this tissue and contribute to the condition.
Why Pilates Helps
Pilates helps reduce strain on the plantar fascia by strengthening the muscles that support the arch of the foot and improving alignment throughout the lower limb. Many individuals rely too heavily on passive structures like ligaments instead of actively stabilizing the foot with muscle support.
Pilates also improves movement patterns higher up the kinetic chain. Weak glutes or restricted ankle mobility can increase forces traveling through the foot. Strengthening the hips and improving ankle mobility helps distribute load more evenly.
Programming Focus
Programming should emphasize strengthening intrinsic foot muscles and improving ankle mobility while minimizing prolonged standing early in recovery.
Gradually reintroducing weight-bearing exercises while strengthening the hips and calves can help restore proper mechanics and reduce stress on the plantar fascia.
Recommended Pilates Exercises
Mat
- Foot Articulation (Point–Flex)
- Toe Curls / Short Foot Exercise
- Calf Stretch (strap-assisted)
- Ankle Circles (For ankle mobility)
- Bridge with Foot Awareness
Reformer
- Footwork (Heels)
- Footwork (Parallel Toes with controlled articulation)
- Running on the Reformer
- Scooter (glute focus)
- Elephant (heel grounding focus)
Chair
- Standing Calf Raise (controlled)
- Seated Foot Pump / Ankle Pump
- Standing Hip Abduction
Cadillac / Tower
- Supine Leg Springs (foot articulation focus)
- Push Through Bar Calf Stretch
- Standing Leg Springs – Hip Extension
Exercises to Avoid (and Why)
- Jumpboard exercises in early stages
- Running or jumping drills
- Long periods of standing balance work early on
Safer Alternatives
- Reformer running instead of jumping
- Seated or supine foot strengthening before standing work
- Supported calf stretching to reduce tension on the fascia
Red Flags & Immediate Referral Indicators
- Severe heel pain that worsens despite rest and gentle exercise
- Sudden sharp tearing sensation in the arch or heel
- Numbness or tingling in the foot (possible nerve involvement)
- Pain that prevents normal walking
2 Knee Osteoarthritis
Overview of the Condition
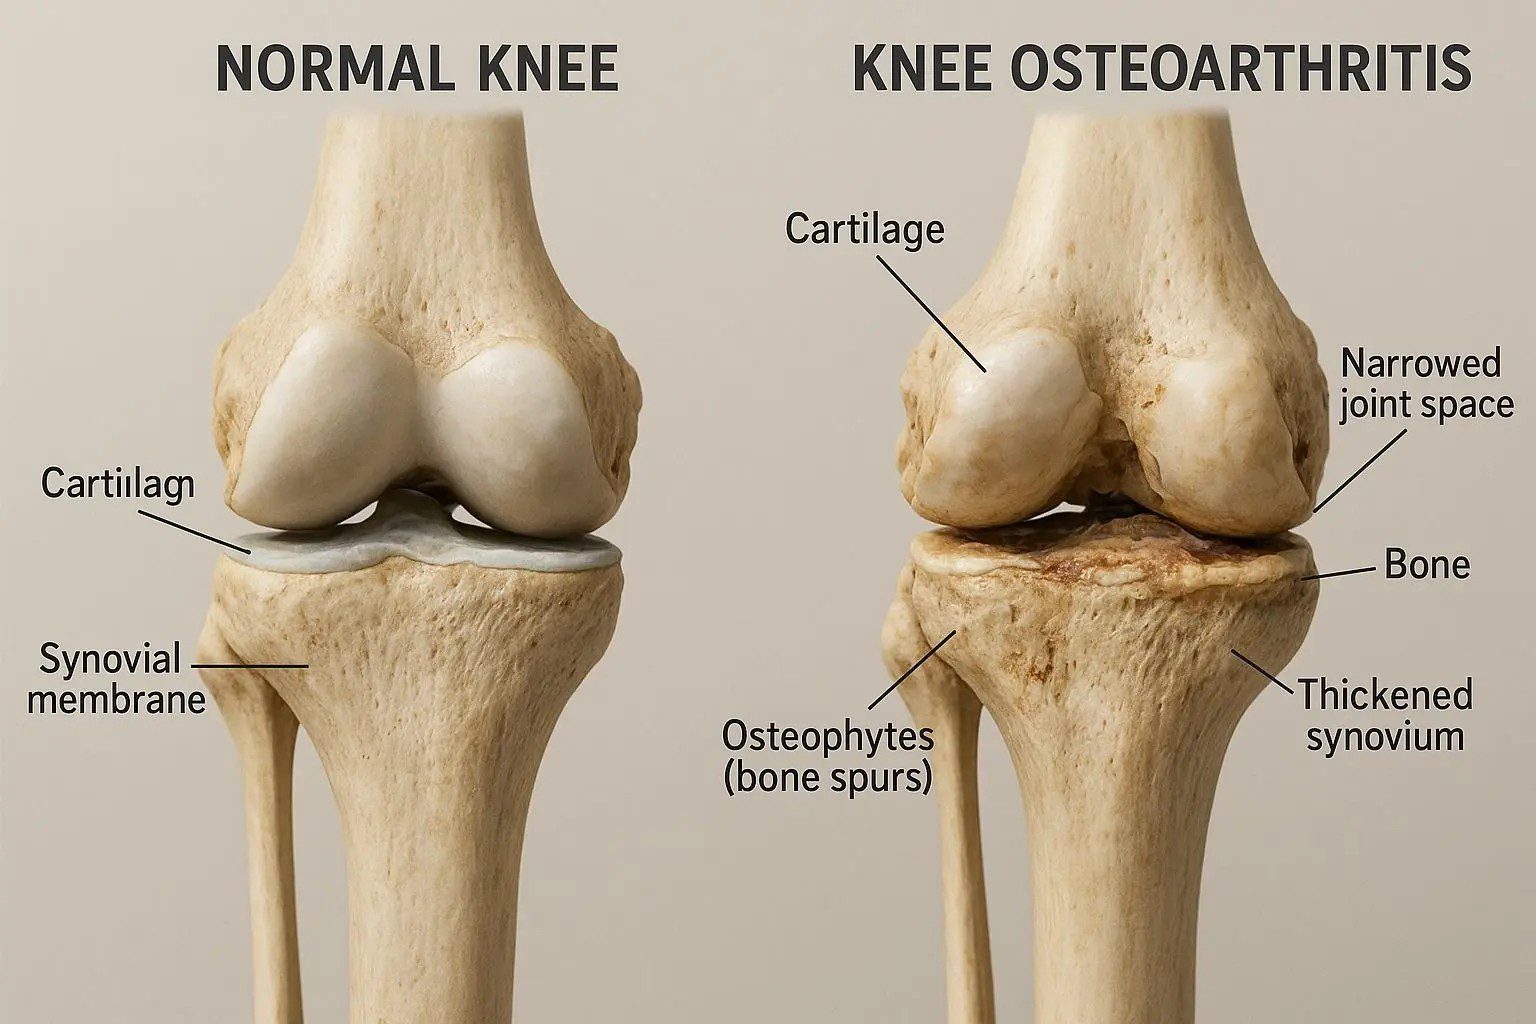
Knee osteoarthritis is a condition that occurs when the protective cartilage inside the knee joint gradually wears down. Cartilage is the smooth, cushioning material that covers the ends of the bones in a joint and allows them to glide smoothly over each other during movement. In a healthy knee, cartilage absorbs shock and reduces friction as we walk, climb stairs, squat, or run. When this cartilage begins to break down, the bones in the joint no longer move as smoothly, which can lead to stiffness, swelling, and pain.
This condition usually develops slowly over time rather than from one specific injury. Aging, previous knee injuries, repetitive stress on the joint, and genetic factors can all contribute to the development of osteoarthritis. As the cartilage becomes thinner, the body may try to stabilize the joint by forming small bony growths called bone spurs. Clients with knee osteoarthritis often report pain during weight-bearing activities such as walking, going down stairs, or standing for long periods. They may also feel stiffness after sitting or resting for a while.
Pilates instructors may notice that clients with knee osteoarthritis avoid bending the knee deeply or shift their weight away from the affected leg. Some clients may also compensate by relying more heavily on the hips or ankles during movement. Understanding these patterns helps instructors modify exercises to reduce unnecessary stress on the knee joint.
Why Pilates Helps
Pilates can be very beneficial for people with knee osteoarthritis because it strengthens the muscles that support and stabilize the knee joint. When the quadriceps, hamstrings, and glute muscles are strong, they help absorb forces that would otherwise be placed directly on the joint surfaces. This muscular support can reduce strain on the knee and improve overall joint stability.
Pilates also improves how the entire lower body works together during movement. Many people with knee pain rely too heavily on the knee joint instead of using the hips effectively. Pilates exercises strengthen the glute muscles and improve hip stability, which helps distribute forces more evenly throughout the legs. When the hips, knees, and ankles move in a coordinated way, the knee joint experiences less stress during everyday activities such as walking or climbing stairs.
Another benefit of Pilates is that most exercises can be performed in supported positions such as lying down or sitting. This allows clients to strengthen the muscles around the knee without placing excessive weight through the joint, which can help build strength safely and gradually.
Programming Focus
When working with clients who have knee osteoarthritis, programming should focus on strengthening the muscles that support the knee while keeping movements controlled and within a comfortable range. Exercises that strengthen the quadriceps and glutes are particularly important because these muscles help stabilize the knee during standing and walking. At the same time, instructors should monitor alignment carefully to ensure the knee tracks over the second and third toes rather than collapsing inward.
It is also important to avoid forcing the knee into deep bending if that position causes pain. Many clients with osteoarthritis feel more comfortable working within a moderate range of motion. Gradually increasing strength and control within these ranges can help improve the knee’s ability to tolerate load over time.
Pilates programming should also address movement patterns above and below the knee. Improving hip strength and ankle mobility can reduce unnecessary stress on the knee joint. When the entire lower body moves efficiently, the knee does not have to compensate for weaknesses elsewhere.
Recommended Pilates Exercises
Mat
- Pelvic Curl / Bridge
- Heel Slides
- Straight Leg Raise
- Clamshell
- Side-Lying Leg Lift
- Hamstring Stretch (strap-assisted)
- Quadriceps Set with Leg Extension
- Spine Twist Supine
Reformer
- Footwork (Parallel Heels)
- Footwork (Parallel Toes – moderate range)
- Footwork (Small V Position)
- Bridging on the Reformer
- Scooter (glute focus)
- Standing Hip Abduction
- Standing Hip Extension
- Running on the Reformer (controlled range)
Chair
- Seated Leg Press
- Hamstring Press Down
- Standing Press Down
- Standing Hip Abduction
Cadillac / Tower
- Supine Leg Springs (Parallel)
- Supine Leg Circles (small range)
- Standing Leg Springs – Hip Abduction
- Standing Leg Springs – Hip Extension
Exercises to Avoid (and Why)
- Exercises that provoke sharp pain or reproduce symptoms should be avoided until the client demonstrates improved strength and control.
- Rapid, uncontrolled loading of the affected joint or tissue may increase irritation and should be introduced gradually only when appropriate.
Safer Alternatives
- Use controlled strengthening in smaller ranges of motion while emphasizing alignment and stability.
- Progress gradually toward larger ranges and more demanding exercises as strength and coordination improve.
Red Flags & Immediate Referral Indicators
- Sudden severe pain, loss of strength, or inability to bear weight.
- Significant swelling, neurological symptoms, or worsening symptoms despite reduced activity.
3 Meniscus Injury
Overview of the Condition
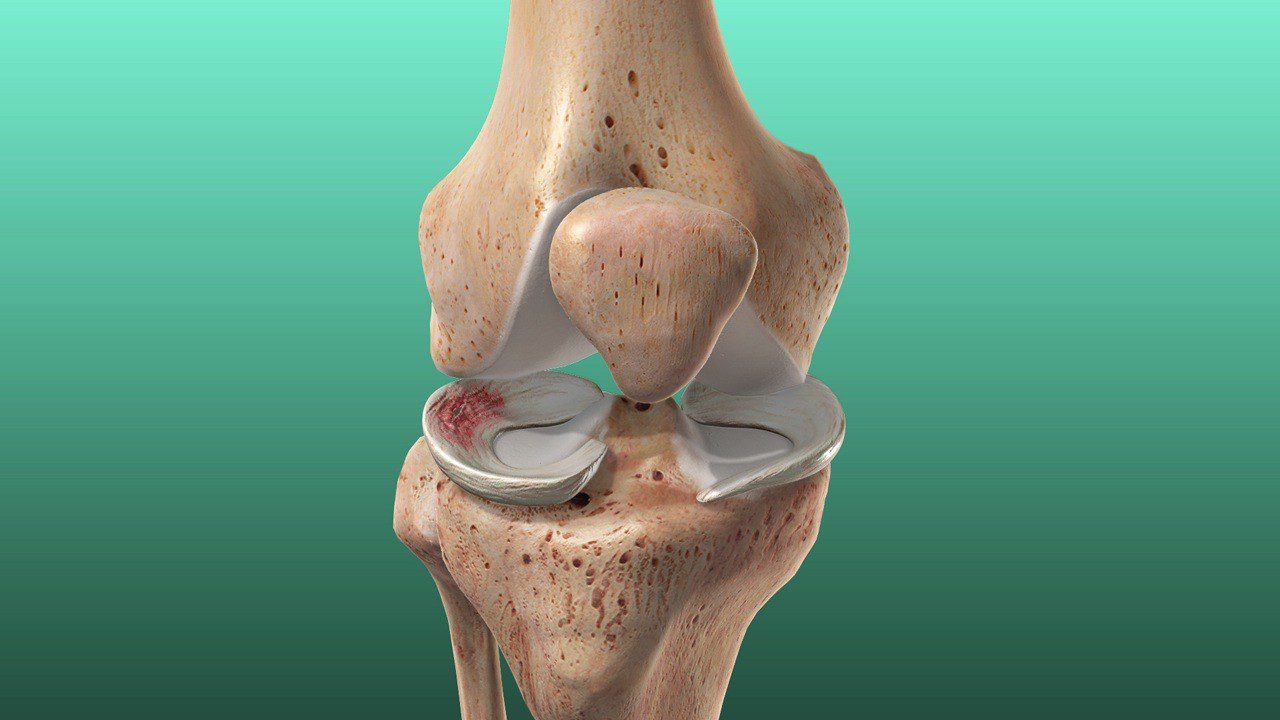
The meniscus is a small but important piece of cartilage located inside the knee joint. Each knee has two menisci that sit between the thigh bone (femur) and the shin bone (tibia). These structures act like shock absorbers, helping distribute weight across the knee joint and improving its stability during movement. They also help the joint move smoothly when the knee bends and straightens.
A meniscus injury occurs when this cartilage becomes torn. This often happens during twisting movements, especially when the foot is planted on the ground and the knee rotates. Athletes commonly experience meniscus tears during sports that involve sudden changes of direction, but these injuries can also occur during everyday activities such as turning quickly or squatting. In older adults, the meniscus can weaken over time, making it more susceptible to tears even without a major injury.
Clients with a meniscus injury often report pain along the inside or outside of the knee joint. They may also experience swelling, clicking, or a feeling that the knee is catching or locking during movement. Some clients find it difficult to fully bend or straighten the knee. Pilates instructors may notice that clients move cautiously or avoid positions that place pressure on the joint.
Why Pilates Helps
Pilates can support recovery from a meniscus injury by strengthening the muscles that stabilize the knee joint and control leg movement. When the quadriceps and hamstrings are strong, they help support the knee and reduce excessive stress on the injured cartilage. This muscular support can improve joint stability and help clients move more comfortably.
Pilates also emphasizes alignment and coordination throughout the entire lower body. Many knee injuries are influenced by how the hips and ankles function. If the hips are weak or unstable, the knee may rotate or collapse inward during movement, placing additional stress on the meniscus. Pilates exercises strengthen the hips and improve control of leg alignment, which helps reduce unnecessary twisting forces through the knee.
Another benefit of Pilates is that exercises can be performed in controlled, low-impact environments such as the Reformer or Cadillac. This allows clients to rebuild strength gradually while avoiding sudden movements that could aggravate the injury.
Programming Focus
Programming for clients with a meniscus injury should prioritize controlled strengthening while avoiding movements that involve twisting or deep knee bending early in recovery. Exercises should focus on improving stability around the knee joint and strengthening the surrounding muscles without placing excessive rotational stress on the joint.
Hip strength should be a major focus because the hips play a key role in controlling knee alignment. Strong glutes help prevent the knee from collapsing inward during movement, which reduces strain on the meniscus. Pilates exercises that promote proper leg alignment and balanced muscle activation are particularly valuable.
As the client gains strength and confidence, exercises can gradually progress to more functional movements such as step work or controlled squats. The key is to progress slowly while ensuring the knee remains stable and pain-free during movement.
Recommended Pilates Exercises
Mat
- Pelvic Curl / Bridge
- Heel Slides
- Straight Leg Raise
- Clamshell
- Side-Lying Hip Abduction
- Quadriceps Set with Leg Extension
- Hamstring Stretch (strap-assisted)
- Supine Knee Extension (small range)
Reformer
- Footwork (Parallel Heels – moderate range)
- Footwork (Parallel Toes – controlled range)
- Bridging on the Reformer
- Scooter (short range, glute focus)
- Supine Leg Press (single or double leg)
- Standing Hip Abduction
- Standing Hip Extension
- Running on the Reformer (small range)
Chair
- Seated Leg Press
- Hamstring Press Down
- Standing Press Down (small range)
- Standing Hip Abduction
Cadillac / Tower
- Supine Leg Springs (parallel alignment focus)
- Supine Leg Circles (small range)
- Standing Leg Springs – Hip Extension
- Standing Leg Springs – Hip Abduction
Exercises to Avoid (and Why)
- Exercises that provoke sharp pain or reproduce symptoms should be avoided until the client demonstrates improved strength and control.
- Rapid, uncontrolled loading of the affected joint or tissue may increase irritation and should be introduced gradually only when appropriate.
Safer Alternatives
- Use controlled strengthening in smaller ranges of motion while emphasizing alignment and stability.
- Progress gradually toward larger ranges and more demanding exercises as strength and coordination improve.
Red Flags & Immediate Referral Indicators
- Sudden severe pain, loss of strength, or inability to bear weight.
- Significant swelling, neurological symptoms, or worsening symptoms despite reduced activity.
Instructor Insight
With meniscus injuries, alignment control is more important than range of motion. Exercises should emphasize keeping the knee tracking forward over the toes while minimizing twisting or deep bending that could stress the cartilage.
4 ACL Injury (Post-Rehabilitation)
Overview of the Condition
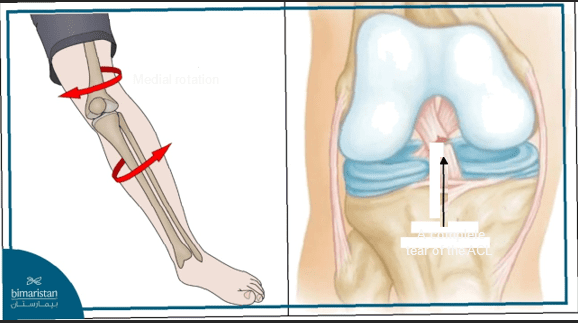
The anterior cruciate ligament, commonly known as the ACL, is one of the main stabilizing ligaments in the knee. It connects the thigh bone (femur) to the shin bone (tibia) and helps control forward movement and rotation of the lower leg. The ACL plays an important role in stabilizing the knee during activities that involve jumping, cutting, or changing direction.
ACL injuries often occur during sports when the knee experiences sudden twisting forces or when a person lands awkwardly from a jump. In many cases the ligament tears completely, which may require surgical reconstruction followed by a long rehabilitation process. Even after rehabilitation, individuals may experience weakness, reduced confidence in the knee, or altered movement patterns.
Clients returning to exercise after an ACL injury may have difficulty controlling the position of the knee during movement. Instructors may notice that the knee collapses inward, the client favors the uninjured leg, or the client avoids certain movements due to fear of reinjury. Rebuilding strength and coordination is essential for restoring safe movement patterns.
Why Pilates Helps
Pilates is particularly helpful after ACL rehabilitation because it focuses on controlled strength and movement awareness. Exercises strengthen the muscles that support the knee, especially the quadriceps, hamstrings, and glutes. These muscles help stabilize the joint and reduce the load placed directly on the ligament.
Pilates also improves neuromuscular control, which means the body becomes better at coordinating muscles during movement. After an ACL injury, the body often loses some of its ability to stabilize the knee automatically. Pilates exercises require precise control and alignment, helping the nervous system relearn how to stabilize the joint effectively.
Another advantage of Pilates is that many exercises can be performed in supported positions before progressing to more demanding movements. This allows clients to rebuild strength gradually while maintaining proper alignment.
Programming Focus
Programming for clients recovering from an ACL injury should emphasize strengthening the glutes, hamstrings, and quadriceps while maintaining careful control of knee alignment. Exercises should encourage the knee to track directly over the toes during movement rather than collapsing inward.
It is important to progress gradually from supported exercises to more functional movements. Early programming may include supine or seated exercises that allow the client to strengthen the legs without excessive load. As strength improves, more weight-bearing exercises such as step work or controlled lunges can be introduced.
Pilates instructors should also focus on improving balance and coordination. These skills are essential for helping the body stabilize the knee during everyday activities and reducing the risk of reinjury.
Recommended Pilates Exercises
Mat
- Pelvic Curl / Bridge
- Single Leg Bridge (when strength allows)
- Heel Slides
- Straight Leg Raise
- Clamshell
- Side-Lying Hip Abduction
- Dead Bug (core + leg control)
- Hamstring Stretch (strap-assisted)
Reformer
- Footwork (Parallel Heels – alignment focus)
- Footwork (Parallel Toes – controlled range)
- Bridging on the Reformer
- Scooter (glute strengthening)
- Standing Hip Abduction
- Standing Hip Extension
- Running on the Reformer (controlled ankle–knee coordination)
- Single Leg Footwork (advanced stage)
Chair
- Seated Leg Press
- Standing Press Down (short range)
- Hamstring Press Down
- Standing Hip Extension
Cadillac / Tower
- Supine Leg Springs (parallel alignment)
- Supine Leg Circles (small range)
- Standing Leg Springs – Hip Extension
- Standing Leg Springs – Hip Abduction
Exercises to Avoid (and Why)
- Exercises that provoke sharp pain or reproduce symptoms should be avoided until the client demonstrates improved strength and control.
- Rapid, uncontrolled loading of the affected joint or tissue may increase irritation and should be introduced gradually only when appropriate.
Safer Alternatives
- Use controlled strengthening in smaller ranges of motion while emphasizing alignment and stability.
- Progress gradually toward larger ranges and more demanding exercises as strength and coordination improve.
Red Flags & Immediate Referral Indicators
- Sudden severe pain, loss of strength, or inability to bear weight.
- Significant swelling, neurological symptoms, or worsening symptoms despite reduced activity.
5 Hip Replacement (Total Hip Arthroplasty)
Overview of the Condition
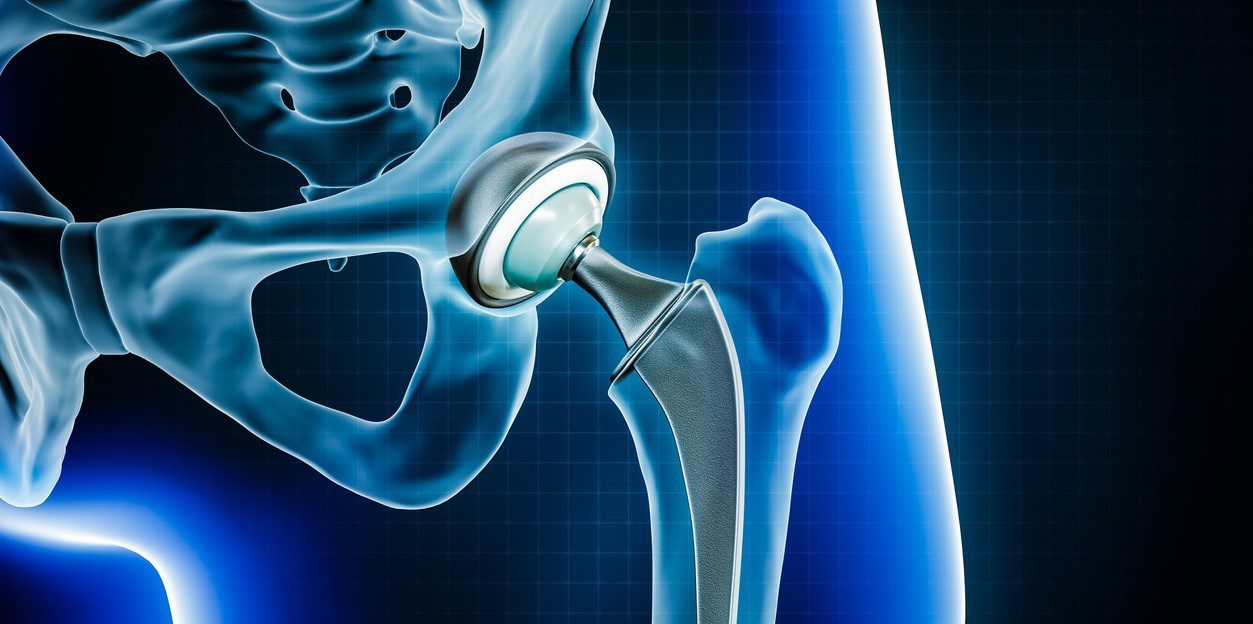
A hip replacement, also called total hip arthroplasty, is a surgical procedure in which a damaged hip joint is replaced with an artificial joint. The hip is a ball-and-socket joint where the top of the thigh bone (femur) fits into a rounded socket in the pelvis. In a healthy joint, smooth cartilage covers these surfaces and allows the bones to glide easily during movement. When this cartilage becomes severely damaged, the joint can become painful, stiff, and difficult to move.
Hip replacements are most commonly performed due to severe osteoarthritis, but they may also occur after fractures, joint degeneration, or other conditions that damage the joint. During surgery, the damaged cartilage and bone are removed and replaced with prosthetic components that are designed to restore smoother movement in the joint. While the artificial joint can significantly reduce pain, the muscles surrounding the hip often become weak during the period before and after surgery.
Clients who have had a hip replacement may experience stiffness, weakness in the hip muscles, or reduced confidence when moving. They may walk with shorter strides or shift weight away from the surgical side. Pilates instructors may also notice reduced hip mobility or difficulty stabilizing the pelvis during leg movements.
Anterior vs. Posterior Approach
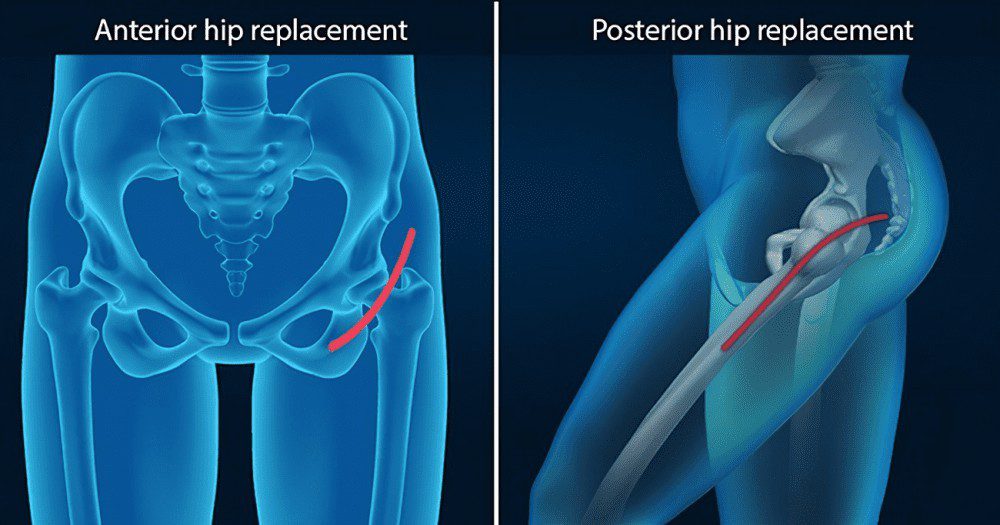
Anterior Hip Replacement (Anterior Approach)
In an anterior hip replacement, the surgeon accesses the hip joint from the front of the body. This approach typically allows the surgeon to work between muscles rather than detaching them, which can sometimes lead to a quicker early recovery. Because the incision is at the front of the hip, the main precaution is avoiding excessive hip extension and external rotation during the early stages of recovery. Pilates instructors should be mindful of exercises that push the leg far behind the body or encourage large open hip positions too early. Most clients with an anterior approach tolerate gentle flexion movements well, but controlled progression and strong glute and hip stabilizer strengthening remain important for long-term joint stability.
Posterior Hip Replacement (Posterior Approach)
In a posterior hip replacement, the surgeon accesses the hip joint from the back of the body. This approach has traditionally been the most common and involves temporarily moving or detaching some of the muscles behind the hip during surgery. Because of this, early precautions usually focus on avoiding excessive hip flexion, adduction, and internal rotation, which could increase the risk of dislocation while the tissues heal. Pilates instructors should be cautious with movements that bring the knee deeply toward the chest, cross the legs, or rotate the leg inward under load. Programming should emphasize rebuilding glute strength, hip stability, and controlled movement patterns to support safe and confident movement.
Why Pilates Helps
Pilates can be extremely helpful for individuals recovering from hip replacement surgery once they have received medical clearance to exercise. One of the primary goals after surgery is rebuilding strength in the muscles that support the hip joint, particularly the glutes, deep hip stabilizers, and core muscles. These muscles help stabilize the pelvis and reduce unnecessary stress on the new joint.
Pilates also improves body awareness and movement control. After surgery, many clients develop compensations such as favoring the non-surgical side or moving cautiously due to fear of pain. Pilates exercises emphasize controlled movement and alignment, which can help clients rebuild confidence in their ability to move safely.
Because Pilates includes many exercises performed in supported positions such as lying down or seated, clients can strengthen the muscles around the hip without placing excessive weight through the joint. This gradual strengthening approach can help restore efficient walking patterns and improve overall stability.
Programming Focus
When programming for clients who have had a hip replacement, the primary focus should be rebuilding hip strength and pelvic stability. Exercises that strengthen the glute muscles are especially important because these muscles play a major role in stabilizing the pelvis during walking and standing. Weak glutes often cause the pelvis to drop to one side, which can place unnecessary strain on the hip joint.
It is also important to pay attention to alignment during leg movements. Clients may compensate by using the lower back or shifting weight unevenly between the legs. Pilates exercises should encourage balanced muscle activation and controlled movement through the hips.
Programming should progress gradually from supported exercises toward more functional movements such as standing leg work or step patterns. This gradual progression helps restore confidence and stability while allowing the muscles surrounding the new joint to strengthen safely.
Recommended Pilates Exercises
Mat
- Pelvic Clock
- Supine Pelvic Curl / Bridge (small range)
- Bent Knee Fallout (hip stability control)
- Heel Slides (maintaining neutral pelvis)
- Side-lying Clamshell
- Side-lying Hip Abduction (small range)
Reformer
- Footwork (parallel and small turnout, moderate range)
- Bridging on Reformer (small range)
- Standing Hip Abduction with light springs
- Scooter (short range, focus on hip extension)
- Supine Leg Press (keeping hip flexion moderate)
Chair
- Seated Leg Press (controlled range)
- Standing Hip Extension Press Down
- Standing Hip Abduction (light resistance)
- Hamstring Press Down (small range)
Cadillac / Tower
- Supine Leg Springs (small controlled range)
- Standing Leg Springs – Hip Extension
- Standing Leg Springs – Hip Abduction
- Supine Arm Work (to maintain full-body conditioning)
Exercises to Avoid (and Why)
- Deep squats or deep lunges – may push the hip into excessive flexion.
- High step-ups or large step patterns – often exceed safe hip flexion range.
- Crossing the legs or adduction under load – can stress the joint depending on surgical precautions.
- Aggressive internal rotation movements – may place strain on the prosthetic joint early on.
Safer Alternatives
- Low-range footwork on the Reformer instead of deep squats.
- Hip extension work (Scooter, Standing Leg Springs) to strengthen glutes safely.
- Side-lying hip strengthening to build pelvic stability.
- Small-range bridges to activate posterior chain without excessive flexion.
Red Flags & Immediate Referral Indicators
- Sudden severe pain, loss of strength, or inability to bear weight.
- Significant swelling, neurological symptoms, or worsening symptoms despite reduced activity.
6 Shoulder Impingement Syndrome
Overview of the Condition
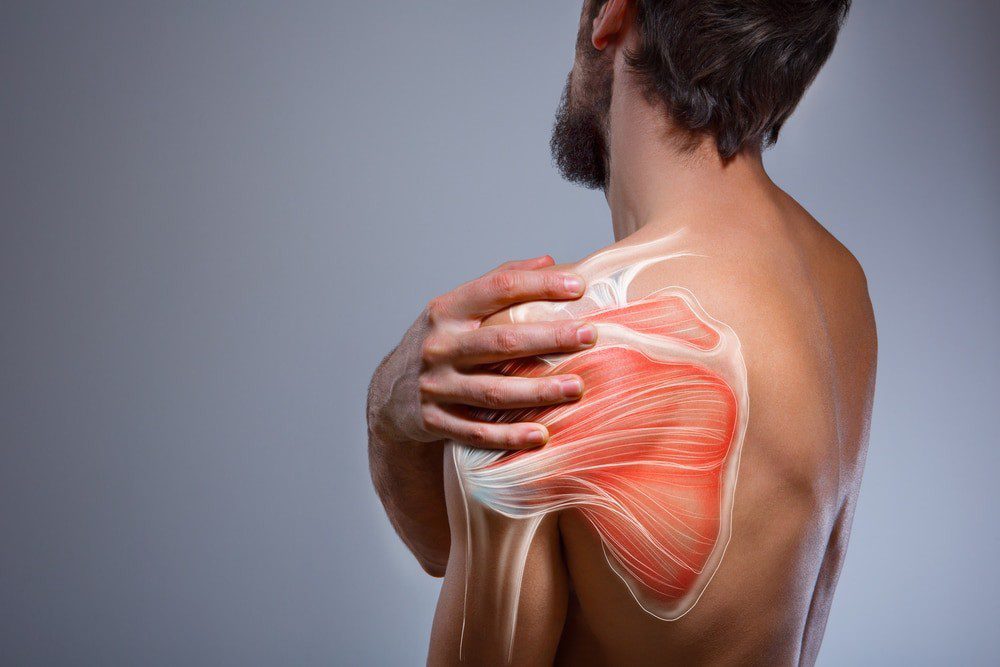
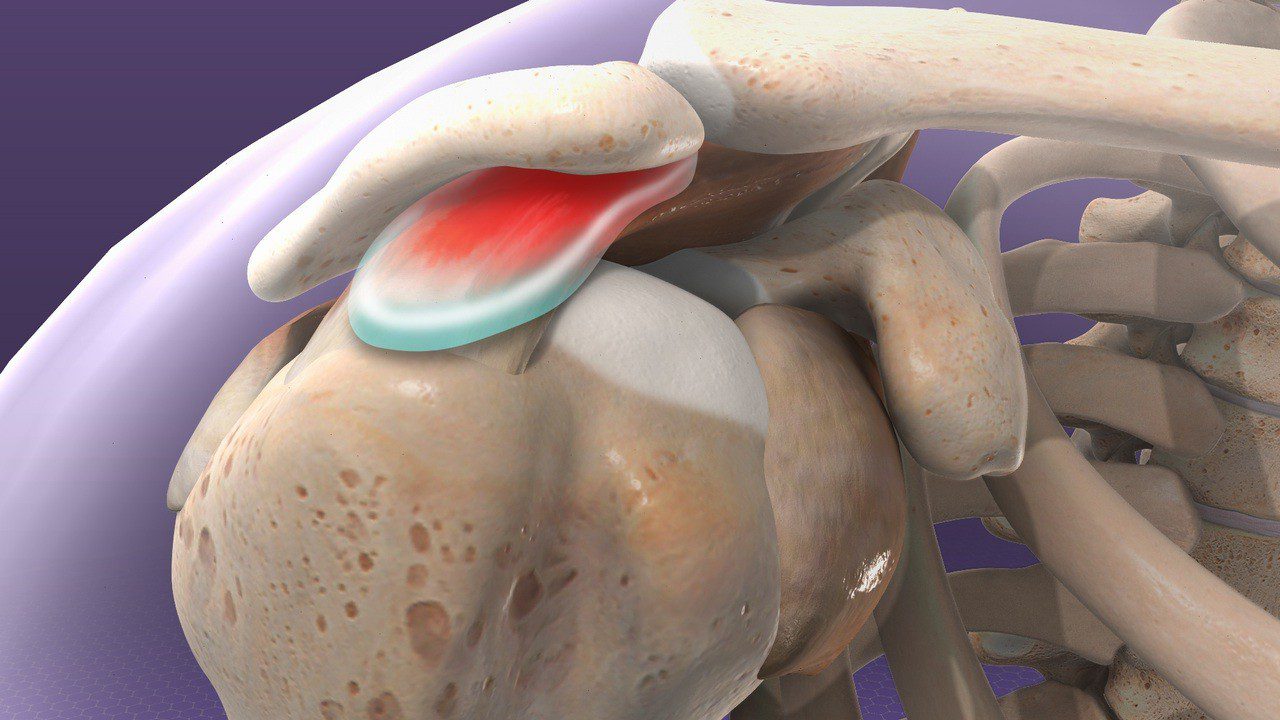
Shoulder impingement syndrome occurs when the tendons of the rotator cuff become compressed within the shoulder joint during arm movement. The shoulder is a complex joint where the upper arm bone (humerus) sits within a shallow socket in the shoulder blade (scapula). Because this joint allows a wide range of motion, it relies heavily on muscles and tendons to maintain stability.
In shoulder impingement, the space where the rotator cuff tendons pass becomes narrowed. As the arm lifts, these tendons can become irritated or compressed between the bones of the shoulder. This compression may develop gradually due to poor posture, muscle imbalances, or repetitive overhead activities such as reaching, lifting, or throwing.
Clients with shoulder impingement often report pain when lifting the arm overhead or reaching behind the body. The discomfort may feel sharp during certain movements or like a dull ache around the front or side of the shoulder. Pilates instructors may notice that clients shrug their shoulders upward or compensate with neck tension when attempting arm movements.
Why Pilates Helps
Pilates can significantly improve shoulder impingement by strengthening the muscles that stabilize the shoulder blade. The position and movement of the scapula play a major role in how the shoulder joint functions. When the muscles that control the scapula are weak or uncoordinated, the shoulder joint may lose space, increasing the likelihood of tendon compression.
Pilates exercises encourage proper scapular positioning and strengthen the muscles that support the shoulder girdle. When these muscles function well, the shoulder blade can move smoothly and maintain space within the joint during arm movement.
Pilates also improves posture and thoracic spine mobility. Many individuals with shoulder impingement have rounded shoulders and a stiff upper back. Improving posture and spinal mobility allows the shoulder joint to move more efficiently and reduces unnecessary stress on the tendons.
Programming Focus
Programming should emphasize scapular stability and proper shoulder alignment before progressing to more demanding arm movements. Exercises that strengthen the muscles around the shoulder blade, such as the lower trapezius and serratus anterior, are particularly important for improving shoulder mechanics.
It is also helpful to address posture and thoracic spine mobility. Improving upper-back mobility allows the shoulder blades to move more naturally and reduces compensatory neck tension. Pilates exercises that promote spinal extension and postural awareness can be especially beneficial.
Arm exercises should begin in controlled ranges of motion and gradually progress as the client gains strength and coordination. Avoiding excessive overhead loading early on allows the irritated tendons to recover while the surrounding muscles become stronger.
Recommended Pilates Exercises
Mat
- Scapular Isolation / Shoulder Blade Setting
- Prone T (mid-back strengthening)
- Prone Y (lower trapezius activation)
- Swan Prep (thoracic extension)
- Arm Circles (supine, small range)
- Side-Lying External Rotation
- Serratus Punches (supine)
- Wall Slide Arm Reach
Reformer
- Arms in Straps (low range)
- Hug-a-Tree
- Reverse Arm Circles
- Serving Tray
- Seated Rowing (short range)
- Long Box Pulling Straps (light resistance)
Chair
- Seated Chest Expansion
- Seated Scapular Retraction
- Seated Tricep Press
- Standing Press Down (scapular stability focus)
Cadillac / Tower
- Arm Springs – Chest Expansion
- Arm Springs – Hug-a-Tree
- Arm Springs – External Rotation
- Push Through Bar – Assisted Arm Reach
- Roll Down Bar – Arm Mobility
Exercises to Avoid (and Why)
- Exercises that provoke sharp pain or reproduce symptoms should be avoided until the client demonstrates improved strength and control.
- Rapid, uncontrolled loading of the affected joint or tissue may increase irritation and should be introduced gradually only when appropriate.
Safer Alternatives
- Use controlled strengthening in smaller ranges of motion while emphasizing alignment and stability.
- Progress gradually toward larger ranges and more demanding exercises as strength and coordination improve.
Red Flags & Immediate Referral Indicators
- Sudden severe pain, loss of strength, or inability to bear weight.
- Significant swelling, neurological symptoms, or worsening symptoms despite reduced activity.
7 Rotator Cuff Injury
Overview of the Condition
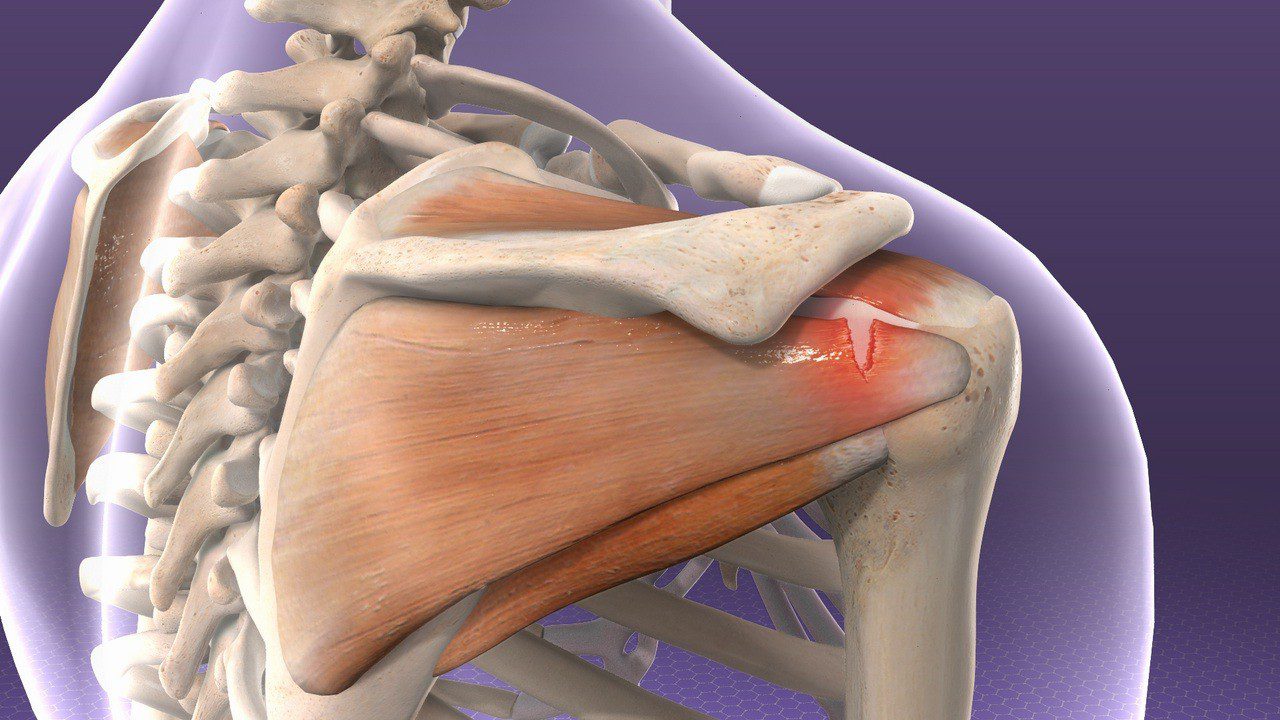
The rotator cuff is a group of four muscles and their tendons that surround the shoulder joint. These muscles help stabilize the head of the upper arm bone within the shoulder socket and guide the movement of the arm. Because the shoulder joint is highly mobile, the rotator cuff plays an essential role in maintaining stability while the arm moves.
Rotator cuff injuries can occur due to overuse, trauma, or gradual degeneration of the tendons. Repetitive overhead activities such as lifting, throwing, or reaching can place repeated strain on the tendons, leading to inflammation or tears. In some cases the tendons may become weakened over time and tear even during relatively simple movements.
Clients with a rotator cuff injury may report shoulder pain, weakness, or difficulty lifting the arm. They may struggle with everyday activities such as reaching into a cabinet or carrying objects. Pilates instructors may notice that the client compensates by using the neck muscles or arching the back when attempting arm movements.
Why Pilates Helps
Pilates can support recovery from rotator cuff injuries by strengthening the muscles that stabilize the shoulder joint. Controlled strengthening of the rotator cuff and surrounding shoulder muscles helps restore balanced support around the joint.
Pilates also improves coordination between the shoulder blade and the arm. Many shoulder injuries occur when these structures are not working together efficiently. Pilates exercises emphasize precise movement and alignment, helping the body relearn how to move the arm while maintaining stability in the shoulder.
Additionally, Pilates can reduce excessive tension in the neck and upper trapezius muscles. When the shoulder stabilizers are weak, these muscles often overwork to compensate. Strengthening the correct muscles helps reduce this pattern.
Programming Focus
Programming should begin with light resistance and controlled movements that focus on shoulder stability. Exercises that strengthen the rotator cuff and scapular stabilizers should be introduced gradually to avoid overloading the injured tissue.
It is important to avoid heavy or repetitive overhead movements early in recovery. Instead, exercises should focus on building strength and control in moderate ranges of motion where the client can maintain good alignment.
As strength improves, exercises can gradually progress to more functional arm movements. The goal is to restore balanced shoulder strength while ensuring the shoulder blade and arm move together efficiently.
Recommended Pilates Exercises
Mat
- Shoulder Blade Setting (Scapular Isolation)
- Supine Arm Slides on Mat
- Supine Arm Circles (small range)
- Supine Arm Reach to Ceiling
- Prone T (very small range)
- Prone Y (low lift only)
- Swan Prep (focus on thoracic extension)
- Side-Lying Arm Circles
Reformer
- Arms in Straps (low range)
- Hug-a-Tree (small range)
- Reverse Arm Circles
- Serving Tray
- Seated Rowing (short range)
- Mermaid (thoracic mobility focus)
Chair
- Seated Chest Expansion
- Seated Arm Circles
- Seated Tricep Press
- Seated Scapular Retraction
Cadillac / Tower
- Arm Springs – Chest Expansion
- Arm Springs – Hug-a-Tree
- Arm Springs – External Rotation
- Push Through Bar – Assisted Arm Lift (small range)
- Roll Down Bar – Arm Mobility
Exercises to Avoid Early
- Overhead arm lifts
- Full arm circles above shoulder height
- Heavy resistance arm work
- Fast or ballistic arm movements
Exercises to Avoid (and Why)
- Exercises that provoke sharp pain or reproduce symptoms should be avoided until the client demonstrates improved strength and control.
- Rapid, uncontrolled loading of the affected joint or tissue may increase irritation and should be introduced gradually only when appropriate.
Safer Alternatives
- Use controlled strengthening in smaller ranges of motion while emphasizing alignment and stability.
- Progress gradually toward larger ranges and more demanding exercises as strength and coordination improve.
Red Flags & Immediate Referral Indicators
- Sudden severe pain, loss of strength, or inability to bear weight.
- Significant swelling, neurological symptoms, or worsening symptoms despite reduced activity.
8 Frozen Shoulder (Adhesive Capsulitis)
Overview of the Condition
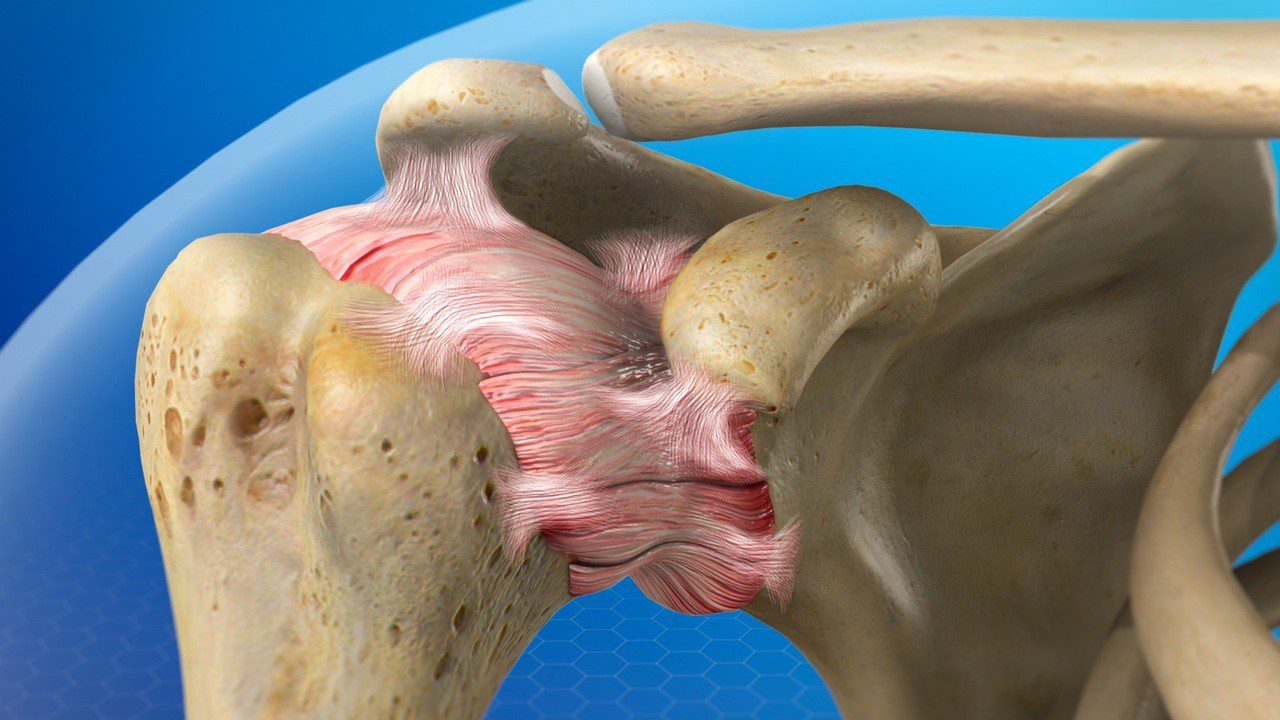
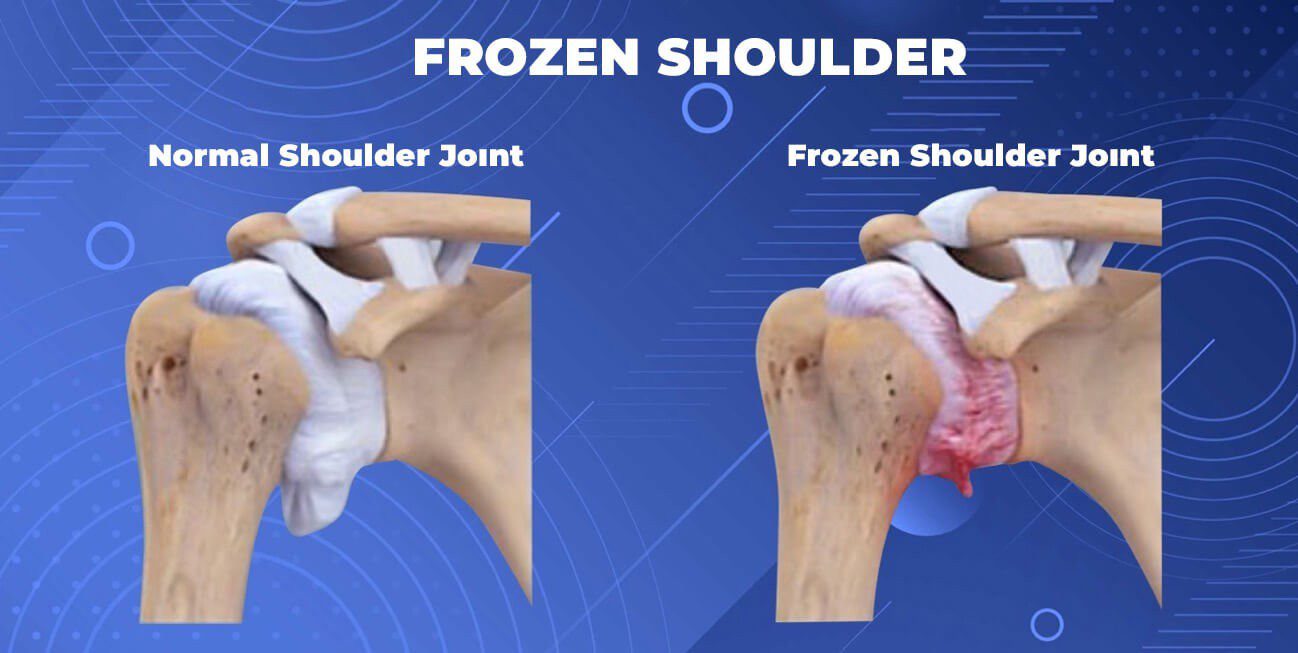
Frozen shoulder, also known as adhesive capsulitis, is a condition that causes significant stiffness and loss of movement in the shoulder joint. The shoulder is surrounded by a connective tissue structure called the joint capsule, which helps stabilize the joint while still allowing a wide range of motion. In frozen shoulder, this capsule becomes inflamed and thickened, which restricts the ability of the joint to move normally.
The condition usually develops gradually and progresses through several stages. In the early stage, clients often experience increasing shoulder pain, especially when trying to reach overhead or behind the body. As the condition progresses, the shoulder becomes increasingly stiff and difficult to move. Eventually, many people experience a stage where the pain decreases but the stiffness remains significant.
Frozen shoulder is more common in individuals between the ages of 40 and 60 and can sometimes develop after a shoulder injury or surgery when the arm has been immobilized for a period of time. It is also more common in individuals with conditions such as diabetes. Pilates instructors may notice that clients with frozen shoulder struggle to lift the arm, reach behind the back, or perform overhead movements without compensating through the neck or spine.
Why Pilates Helps
Pilates can be very helpful for individuals with frozen shoulder because it encourages gentle movement and gradual restoration of mobility without forcing the joint into painful positions. Controlled movement helps maintain circulation to the tissues surrounding the shoulder joint, which can support healing and reduce stiffness.
Pilates also strengthens the muscles that stabilize the shoulder blade. The shoulder blade plays an important role in how the arm moves, and improving scapular stability can help the shoulder joint function more efficiently. When the muscles surrounding the shoulder blade are strong and coordinated, they help support the arm during movement and reduce unnecessary strain on the joint.
Another important benefit of Pilates is that it improves posture and upper-body alignment. Many clients with shoulder stiffness develop compensations such as rounding the shoulders or elevating the neck muscles. Pilates exercises that encourage better posture and thoracic spine mobility can help create more space for the shoulder joint to move.
Programming Focus
Programming for clients with frozen shoulder should focus on gentle mobility and gradual strengthening. Movements should stay within a comfortable range and should never force the shoulder into painful positions. The goal is to encourage movement while respecting the current limitations of the joint.
Exercises that promote scapular stability are particularly important. Strengthening the muscles that control the shoulder blade helps support the shoulder joint and allows the arm to move more efficiently. This often reduces compensatory patterns such as excessive neck tension or spinal arching.
Pilates instructors should also emphasize slow, controlled movements and focus on quality rather than range. Over time, gradual improvements in strength and coordination can help restore shoulder mobility while maintaining joint safety.
Recommended Pilates Exercises
Mat
- Shoulder Blade Setting (Scapular Isolation)
- Supine Arm Slides on Mat
- Supine Arm Circles (small range)
- Supine Arm Reach to Ceiling
- Prone T (very small range)
- Prone Y (low lift only)
- Swan Prep (focus on thoracic extension)
- Side-Lying Arm Circles
Reformer
- Arms in Straps (low range)
- Hug-a-Tree (small range)
- Reverse Arm Circles
- Serving Tray
- Seated Rowing (short range)
- Mermaid (thoracic mobility focus)
Chair
- Seated Chest Expansion
- Seated Arm Circles
- Seated Tricep Press
- Seated Scapular Retraction
Cadillac / Tower
- Arm Springs – Chest Expansion
- Arm Springs – Hug-a-Tree
- Arm Springs – External Rotation
- Push Through Bar – Assisted Arm Lift (small range)
- Roll Down Bar – Arm Mobility
Exercises to Avoid Early
- Overhead arm lifts
- Full arm circles above shoulder height
- Heavy resistance arm work
- Fast or ballistic arm movements
Exercises to Avoid (and Why)
- Exercises that provoke sharp pain or reproduce symptoms should be avoided until the client demonstrates improved strength and control.
- Rapid, uncontrolled loading of the affected joint or tissue may increase irritation and should be introduced gradually only when appropriate.
Safer Alternatives
- Use controlled strengthening in smaller ranges of motion while emphasizing alignment and stability.
- Progress gradually toward larger ranges and more demanding exercises as strength and coordination improve.
Red Flags & Immediate Referral Indicators
- Sudden severe pain, loss of strength, or inability to bear weight.
- Significant swelling, neurological symptoms, or worsening symptoms despite reduced activity.
9 Carpal Tunnel Syndrome
Overview of the Condition
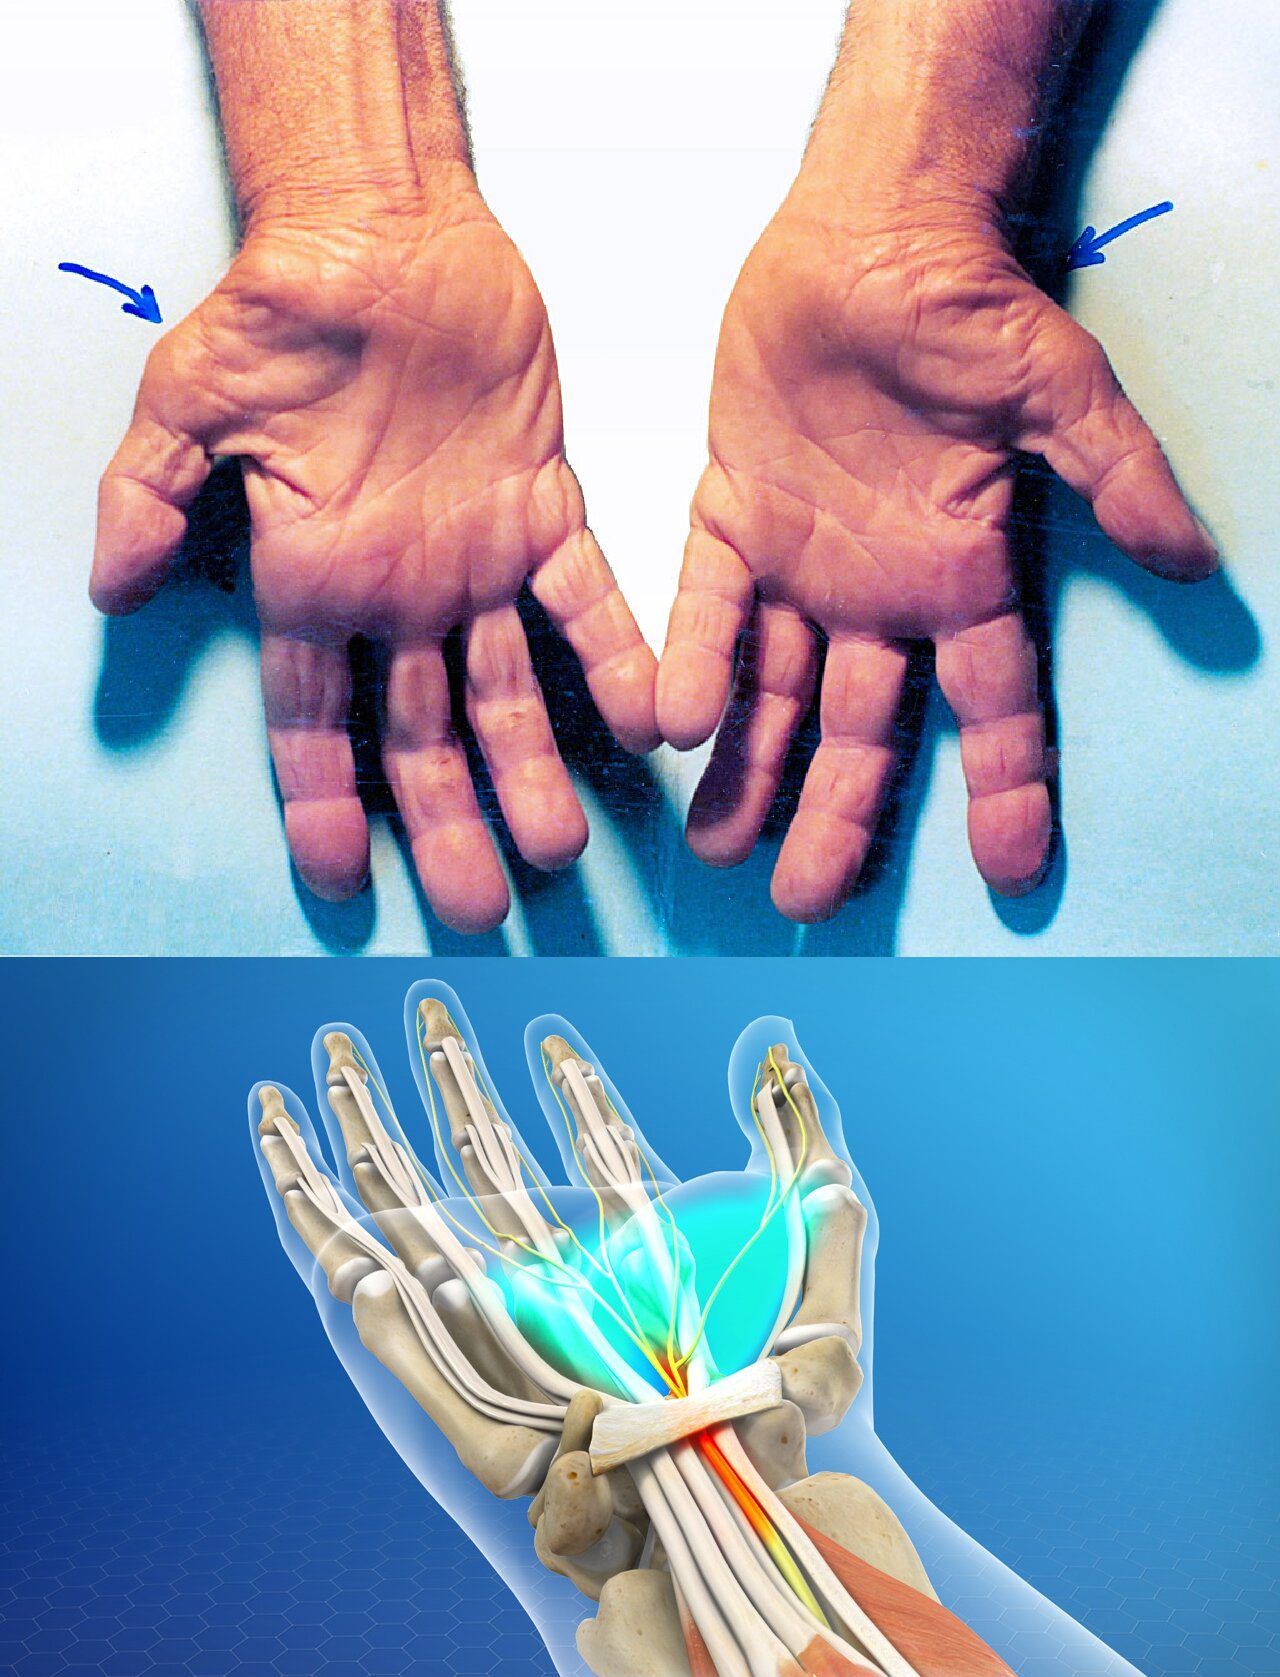
Carpal tunnel syndrome is a condition that affects the wrist and hand and occurs when the median nerve becomes compressed as it passes through a narrow space in the wrist called the carpal tunnel. The carpal tunnel is formed by small bones in the wrist and a thick ligament that stretches across them. Inside this tunnel run several tendons that control finger movement along with the median nerve, which provides sensation and motor control to parts of the hand and fingers.
When the tendons inside the tunnel become irritated or swollen, pressure inside the space increases and the median nerve becomes compressed. This compression can lead to symptoms such as numbness, tingling, burning, or weakness in the hand. Many people first notice symptoms in the thumb, index finger, and middle finger. In some cases the discomfort may travel up into the forearm.
Carpal tunnel syndrome often develops gradually and is commonly associated with repetitive hand movements, prolonged wrist flexion, or poor ergonomic positioning during daily activities such as typing. Clients may report dropping objects, difficulty gripping, or waking at night due to numbness in the hand. Pilates instructors may notice that clients feel uncomfortable placing weight through their hands during exercises such as planks, push-ups, or weight-bearing positions on the Reformer.
Why Pilates Helps
Pilates can help individuals with carpal tunnel syndrome by strengthening the muscles of the shoulder girdle and upper back, which helps redistribute forces away from the wrists. When the shoulders and upper back are strong and stable, less weight and tension are transferred into the wrists during weight-bearing movements. This can reduce irritation in the carpal tunnel.
Pilates also promotes improved posture and alignment. Many people who spend long hours at a desk develop rounded shoulders and forward head posture. This positioning can increase tension through the arms and wrists. By strengthening the muscles that support the shoulder blades and encouraging better posture, Pilates can help reduce strain traveling down the arms.
Another benefit of Pilates is that exercises can easily be modified to reduce direct pressure on the wrists. Instructors can adjust positions, use props, or change hand placement so that clients can continue strengthening the upper body without aggravating symptoms.
Programming Focus
When programming for clients with carpal tunnel syndrome, instructors should minimize prolonged wrist loading and avoid positions that place excessive pressure through the hands. Exercises that require weight-bearing through the wrists may need to be modified by using fists, forearms, or supportive props.
Strengthening the muscles that support the shoulder girdle should be a primary focus. Exercises that improve scapular stability and upper-back strength can help redistribute forces throughout the arm and reduce the amount of stress transferred to the wrists.
It can also be helpful to include exercises that promote mobility and circulation in the forearms and hands. Gentle strengthening of the forearm muscles can help support the wrist joint and improve overall arm function. As symptoms improve, weight-bearing exercises can gradually be reintroduced with careful attention to wrist alignment.
Recommended Pilates Exercises
Mat
- Scapular Isolation (Scapular Slides / Shoulder Blade Setting)
- Prone T (strengthens mid-back without wrist loading)
- Prone Y (scapular stabilization)
- Swan Prep (thoracic extension improves arm mechanics)
- Arm Circles (supine)
- Dead Bug with Arm Reach
Reformer
- Arms in Straps (supine)
- Hug-a-Tree
- Reverse Arm Circles
- Serving Tray
- Chest Expansion
Chair
- Seated Chest Expansion
- Seated Tricep Press
- Seated Arm Circles
Cadillac / Tower
- Arm Springs – Chest Expansion
- Arm Springs – Hug-a-Tree
- Arm Springs – External Rotation
- Roll Down Bar Arm Work
Exercises to Avoid (and Why)
- Planks or long weight-bearing positions on the hands – place sustained compression through the wrist.
- Push-ups on the floor or Reformer – require strong wrist extension.
- Exercises requiring deep wrist extension – increase pressure within the carpal tunnel.
Safer Alternatives
- Forearm plank instead of hand plank
- Push-ups on fists or using handles to keep wrists neutral
- Reformer arm work in straps instead of weight-bearing positions
- Cadillac arm springs to strengthen arms without wrist loading
Red Flags & Immediate Referral Indicators
- Sudden severe pain, loss of strength, or inability to bear weight.
- Significant swelling, neurological symptoms, or worsening symptoms despite reduced activity.
10 Fibromyalgia
Overview of the Condition
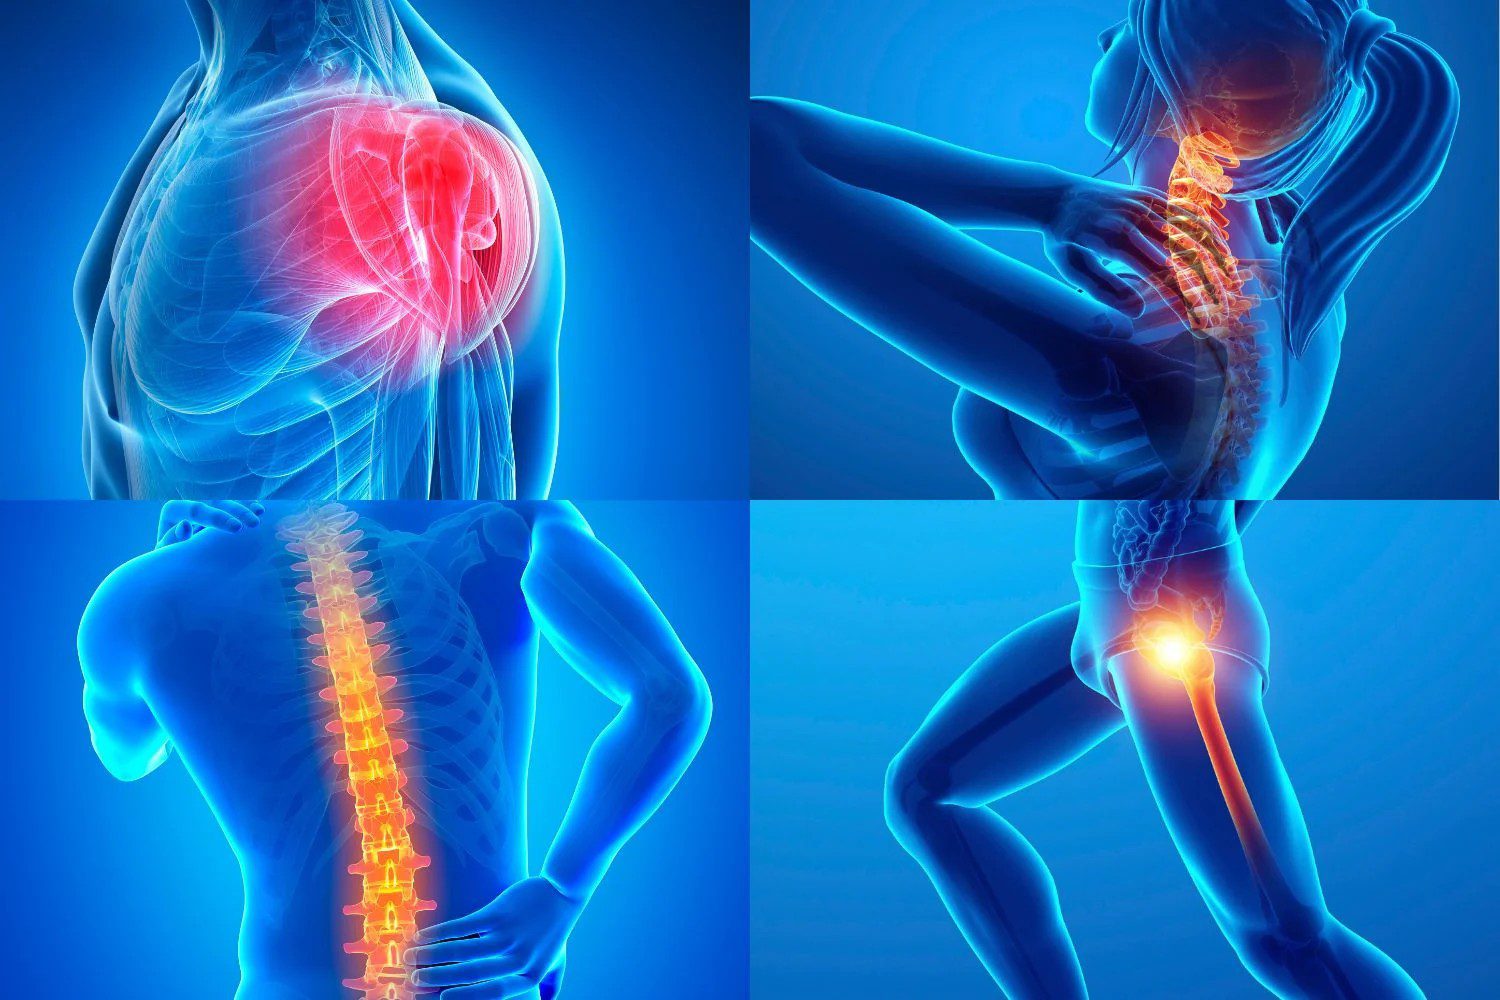
Fibromyalgia is a chronic condition that causes widespread musculoskeletal pain throughout the body. Unlike many orthopedic injuries, fibromyalgia does not involve damage to specific joints, muscles, or tissues. Instead, the condition is believed to involve changes in how the nervous system processes pain signals. The nervous system becomes more sensitive, causing normal sensations to be interpreted as painful.
Individuals with fibromyalgia often experience persistent pain in multiple areas of the body along with fatigue, stiffness, and difficulty recovering from physical activity. Many people also experience sleep disturbances, headaches, and difficulty concentrating.
Because the nervous system is more sensitive, even low levels of physical activity can sometimes trigger increased pain or fatigue.
Clients with fibromyalgia may appear physically healthy but report significant discomfort or exhaustion after exercise. Pilates instructors may notice that these clients fatigue more quickly than expected or feel sore after activities that would normally be considered light intensity. Understanding the neurological nature of fibromyalgia helps instructors approach exercise programming with patience and flexibility.
Why Pilates Helps
Pilates can be very beneficial for individuals with fibromyalgia because it provides low-impact movement that encourages circulation and mobility without placing excessive stress on the body. Gentle movement helps maintain joint mobility and can reduce stiffness that often develops when individuals avoid activity due to pain.
Pilates also emphasizes controlled movement and body awareness, which allows clients to move at a pace that feels manageable. Because exercises can easily be adjusted for intensity, Pilates allows clients to gradually build strength and endurance without overwhelming the nervous system.
Breathing techniques used in Pilates can also help reduce tension and promote relaxation. Many individuals with fibromyalgia experience chronic muscle tension, and learning to coordinate breathing with movement can help reduce unnecessary muscle activation and improve overall movement efficiency.
Programming Focus
Programming for clients with fibromyalgia should emphasize gentle movement and gradual progression. It is important to start with exercises that are low intensity and avoid long or overly demanding sessions. Many clients benefit from shorter sessions that allow them to move without becoming overly fatigued.
Exercises should focus on improving circulation, mobility, and light muscular strengthening. Slow, controlled movements are often more comfortable for clients than fast or high-intensity exercises. Pilates instructors should also encourage clients to rest when needed and listen to their body’s signals.
Another key focus should be pacing. Clients with fibromyalgia may feel good during exercise but experience fatigue later in the day. Helping clients develop awareness of their energy levels can allow them to progress more consistently without triggering flare-ups.
Recommended Pilates Exercises (Nervous System Friendly Exercises)
Mat
- Constructive Rest + Diaphragmatic Breathing (hands on ribs to feel expansion)
- Pelvic Clock (gentle spinal/pelvic mobility without fatigue)
- Knee Folds (slow marching, small range)
- Heel Slides (low effort, teaches pelvic stability)
- Pelvic Curl / Bridge (small range) (posterior chain without intensity)
- Spine Twist Supine (gentle rotation, reduces stiffness)
- Arm Circles (supine, small range) (shoulder mobility without load)
Reformer
- Footwork (very light–moderate springs, moderate range)
- Bridging on Reformer (small range)
- Arms in Straps (very light springs)
- Leg Circles in Straps (small range, slow)
- Elephant (only if tolerated – micro range, focus on breath)
- Mermaid (supported, slow)
Chair
- Seated Press Down (light)
- Seated Cat / Spine Mobility (if your chair allows or done beside chair)
- Seated Leg Pump (very small range, light spring)
- Standing Press Down (only if energy is good that day)
Cadillac / Tower
- Roll Down Bar (gentle spinal articulation OR just shoulder mobility)
- Supine Leg Springs (very light, small range)
- Arm Springs – Chest Expansion (light)
- Arm Springs – Hug-a-Tree (light)
- Push-Through Bar – Cat (gentle, supported)
Exercises to Avoid (and Why)
- High-intensity jumpboard / cardio bursts – can trigger symptom flare-ups and delayed fatigue.
- Long planks or heavy weight-bearing – increases bracing and nervous system “threat”.
- Very long sessions with no rest breaks – many clients crash later in the day.
- High-spring / heavy resistance work – may feel good in the moment but can cause post-session flare.
Safer Alternatives
- Shorter sessions (or mini blocks with rests) instead of long continuous workouts
- Light springs + slow tempo instead of intensity
- Supine/side-lying positions instead of prolonged standing work
- Breath-led movement and “stop while still feeling good” pacing
- Options-based programming (A/B/C levels based on energy that day)
Red Flags & Immediate Referral Indicators
- Sudden change in symptoms that feels unusual or alarming (new neurological symptoms, severe weakness, faintness)
- Pain that is sharp, localized, or clearly injury-like rather than the usual widespread pattern
- Severe post-exertional crash that lasts days after even gentle sessions (needs medical re-check and re-scaling)
- Chest pain, dizziness, or shortness of breath beyond normal exertion